17 - 从 LiDAR 点云重建三维场景¶
less.lidar 把 LiDAR 点云(ALS / TLS / UAV 来源皆可)转成 LESS 仿真用的 3D 场景:地形 + 树冠包络 + 叶片填充。输入 .las/.laz 文件,输出可直接跑 simulate() 的 less.Scene。
先装可选依赖
less.lidar 用到 laspy / scipy / trimesh / cloth-simulation-filter(CSF 地面滤波),默认 pip install less3d 不带。先装:
详见 第 2 章 § 可选扩展。
1. 重建管线一览¶
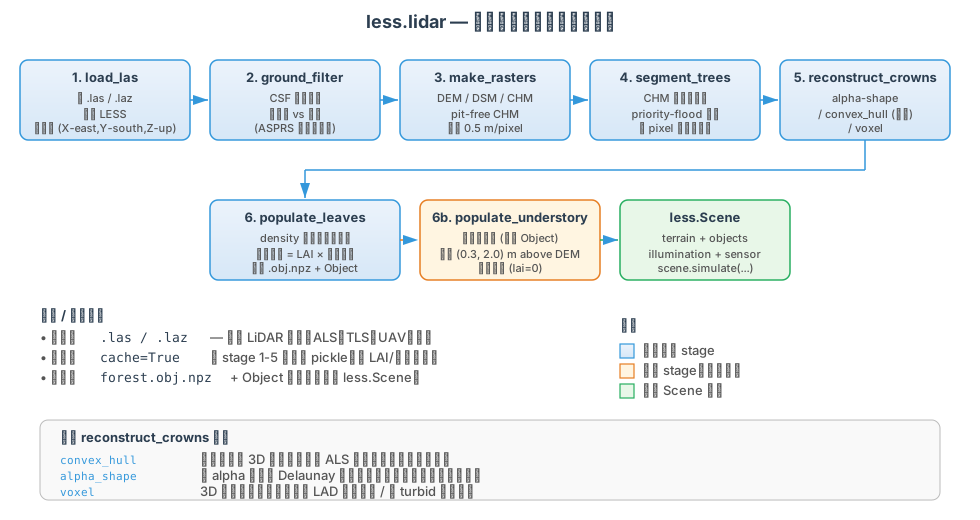
| Stage | 函数 | 干啥 |
|---|---|---|
| 1 | load_las |
读 .las/.laz,归到 LESS 坐标系 |
| 2 | ground_filter |
CSF 布料模拟,地面 vs 植被分类 |
| 3 | make_rasters |
DEM / DSM / pit-free CHM |
| 4 | segment_trees |
CHM watershed 找单木 |
| 5 | reconstruct_crowns |
冠层几何(alpha-shape / convex_hull / voxel) |
| 6 | populate_leaves |
冠内 density-weighted 采样叶片 |
| 6b | populate_understory |
林下层灌木(可选) |
每个 stage 都是 pure function,可以单独跑也可以一把梭 from_las()。
2. 最小用法¶
样例数据下载
本章演示用的样地点云: als_plot.las(1.6 MB,约 123×108 m 林分)。下载后放到工作目录,下面的代码即可直接跑。
import less
from less import lidar

scene = lidar.from_las("als_plot.las", lai=2.0)
scene.illumination = less.Illumination(source=less.Sun(zenith=30, azimuth=180), atmosphere=less.NoAtmosphere())
sensor = less.OpticalImager(
    projection=less.Orthographic(resolution=0.5),
    bands=[550, 650, 850], quality=32,
)
img = scene.simulate(sensor).to_brf()
less.save_image(img, "render.png", false_color=[2, 1, 0])
输出物(默认在 <las_basename>_lidar/ 目录下):
plot_lidar/
├── forest.obj.npz       ← 全部树叶几何(npz 二进制,scene.build 直接读)
├── understory.obj.npz   ← 如果开了 understory_lai>0
└── .cache/              ← stage 1-5 结果 pickle(cache=True 时)
在浏览器里看一眼场景¶
跑 simulate() 之前,先用 scene.show() 打开交互式 viewer 看下重建效果(地形、冠层包络、叶片分布是否合理):
三个 tab:
- Scene —— 3D 几何浏览,可隐藏/显示地形和各 Object,鼠标拖拽旋转
- Render —— 简易预览,快速试光照角度和光谱
- Simulate —— 配 sensor 跑正式仿真,结果就地展示
详细用法见 15 - 交互式可视化。
3. 重要参数¶
3.1 LAI / 叶片¶
lidar.from_las("plot.las",
    lai=2.0,              # 场景级 LAI(含林窗,最常用)
    # lad=1.5,            # 或:体密度 m²/m³(每棵树一致)
    # lai_per_tree={1: 2.0, 2: 3.5, ...},   # 或:按 tree_id 单独
    leaf_area=0.05,       # 单叶面积 m² (默认 0.01 = 100 cm²)
    leaf_shape="square",  # "square" (2 三角) / "disk" (12 三角)
    leaf_angle="spherical",   # 角度分布
    jitter_sigma=None,    # density 采样的高斯抖动半径 (m)
)
高 LAI 大场景会生成几百万叶片。
leaf_shape="square"+ 调大leaf_area(0.05-0.1) 是常用的提速组合。
3.2 重建方法与叶片采样¶
有两个参数配合工作,要一起理解:
method—— 怎么重建冠层几何(算体积、画轮廓)sampling—— 叶片放哪里
lidar.from_las("plot.las", lai=2.0,
    method="convex_hull",     # "convex_hull" / "alpha_shape" / "voxel"
    sampling="density",       # "density" / "uniform"
)
三种 method¶
method |
说明 | 适用 |
|---|---|---|
convex_hull |
整树凸包 | 默认;稀疏 ALS(≤ 5 pts/m²),不丢点 |
alpha_shape |
Delaunay 四面体按 alpha 阈值筛 |
密点云(≥ 20 pts/m²)/ TLS,能捕获冠层凹陷 |
voxel |
3D 占据栅格 | 想直接按 voxel 控制 LAD |
两种 sampling¶
sampling |
叶片放哪里 |
|---|---|
density(默认) |
从该树的 LiDAR 返回点中随机挑 + 高斯抖动 jitter_sigma |
uniform |
在 method 产生的体积内(四面体 / voxel)均匀采样 |
组合效果¶
method + sampling |
叶片位置由什么决定 | method 的作用 |
|---|---|---|
convex_hull + density(默认组合) |
LiDAR 点分布 | 只影响体积 → 总叶片数微调 |
alpha_shape + density |
LiDAR 点分布 | 只影响体积 → 总叶片数微调 |
voxel + density |
LiDAR 点分布 | 只影响体积 → 总叶片数微调 |
convex_hull + uniform |
Delaunay 四面体内均匀 | 决定填充范围(凸包) |
alpha_shape + uniform |
保留的四面体内均匀 | 决定填充范围(含凹陷) |
voxel + uniform |
每个 voxel AABB 内均匀 | 决定填充范围(离散网格) |
想看 method 的视觉效果?
默认 sampling="density" 下,三种 method 视觉几乎一样 —— 叶片都在 LiDAR 返回点附近。要看出 method 差异,切 sampling="uniform"。
LAI 守恒:不论哪种组合,总叶面积 = LAI × 场景面积 严格不变。采样方式只决定叶子在哪。
3.3 林下层(可选)¶
lidar.from_las("plot.las", lai=2.0,
    understory_lai=0.3,                   # 0 关闭(默认)
    understory_height_range=(0.3, 2.0),   # 离地高度 m
    understory_leaf_area=0.02,
    understory_leaf_angle="planophile",
)
林下层走独立 populate_understory —— 1 个 Object,叶片密度跟随实际低位 LiDAR 返回分布。
3.4 平地 vs DEM¶
normalize=True:把每个点 z 减去其 XY 位置的 DEM 值(点云归一化到平地),最终 scene 用平面地形。适合 plot-scale 仿真(不关心地形起伏,渲染更快)。
normalize=False(默认):保留真实 DEM,地形 mesh 进入场景。
3.5 Cache(强烈推荐开)¶
把 stage 1-5 的产物(points / rasters / segmentation / crowns)pickle 到 <basename>_lidar/.cache/pipeline_<hash>.pkl。Cache key 不包含叶片参数,所以调 LAI / 叶片光谱 / leaf_angle 都能命中 cache,几秒就重出 scene。
仅当你改了 geometry 参数(resolution / method / min_tree_height / normalize 等)时 cache 才失效。
3.6 默认参数表(最简调用)¶
等价于:
| 参数 | 默认 | 说明 |
|---|---|---|
resolution |
0.5 | DEM/CHM m/pixel |
method |
"convex_hull" | 冠层几何 |
min_tree_height |
2.0 | CHM 阈值 m |
min_tree_distance |
3.0 | 树顶最小水平距 m |
leaf_area |
0.01 | 单叶面积 m² |
leaf_shape |
"square" | 2 三角/叶 |
leaf_angle |
"spherical" | |
understory_lai |
0.0 | 关闭林下层 |
normalize |
False | 保留 DEM |
cache |
False | 不缓存 |
write_obj |
False | 只写 npz,不写 OBJ 文本 |
output_mode |
"merge" | 全部树叶合并到一个 Object |
4. 分阶段 API(专家用,便于缓存中间结果)¶
pc      = lidar.load_las("plot.las")
pc      = lidar.ground_filter(pc)               # 默认走 CSF
rasters = lidar.make_rasters(pc, resolution=0.5)
seg     = lidar.segment_trees(rasters,
                              min_height=2.0,
                              min_distance=3.0)
crowns  = lidar.reconstruct_crowns(
              pc, seg,
              method="convex_hull",
              rasters=rasters,                  # 必传,否则 sub-canopy 不过滤
              min_canopy_height=2.0,
              understory_layer=False)

crowns.save("plot.crowns")        # pickle 缓存重建结果

# --- 后续调 LAI 只要这一步 ---
crowns = lidar.Crowns.load("plot.crowns")
forest_obj, forest_pos = lidar.populate_leaves(
    crowns,
    lai=2.0, leaf_area=0.05,
    out_path="forest.obj")

# 自己组 Scene
import numpy as np
scene = less.Scene()
scene.size = pc.extent
scene.terrain = less.Terrain(
    property=less.SpectrumDB("dark_soil_mollisol"),
    dem=rasters.dem.astype(np.float32))
scene.illumination = less.Illumination(source=less.Sun(zenith=30, azimuth=180), atmosphere=less.NoAtmosphere())
scene.add(forest_obj, positions=forest_pos)
分阶段 API 和
from_las产物完全等价 —— 只是前者能让你把中间结果(比如crowns)单独 pickle 出来,调光谱/叶片参数时重跑populate_leaves即可。
5. 重建后修改光谱¶
构建过的 scene 不需要 rebuild 就能换叶片 / 地表光谱:
forest = scene.objects["forest"]

# 切换树种谱
forest.set_property("leaves", less.SpectrumDB("larch_leaf_green"))
# 或物理叶片模型
forest.set_property("leaves", less.Prospect(cab=15))   # 黄化
# 换地表
scene.terrain.set_property(less.SpectrumDB("loam_brown"))

img = scene.simulate(sensor)   # 自动 reuse 路径,不重建 BVH
详见 16 - Scene 与 Project:参数热更新与几何重建。
6. 性能小提示¶
| 场景 | 调参建议 |
|---|---|
| 调 LAI 的迭代实验 | cache=True,叶片参数随便改 |
| 高 LAI(≥ 3)大场景 | leaf_area=0.05、leaf_shape="square" |
| 想可视化看几何 | write_obj=True(用 Blender 打开生成的 OBJ) |
| 不想写盘 | 直接用分阶段 API,最后 populate_leaves(write_obj=False) 只出 npz |
| 出冠的叶子让人不爽 | constrain_to_hull=True(注意大 jitter 时可能丢 LAI) |
7. 当前已知限制¶
| 限制 | 说明 |
|---|---|
| 只重建冠层 | 无树干 / 枝干几何 (LiDAR 反射本身也很难分这些) |
| 单一组件 | 默认所有叶片在一个 g leaves 组里。output_mode="groups" 可按种 / 按树分组 |
| LAI 来源 | 必须用户手动指定(lai / lad / lai_per_tree 三选一);不支持从 LiDAR 反演 |
| understory 不分单棵 | 整片林下层一个 Object,无法逐丛灌木独立控制 |
8. 一个完整 demo¶
import os, less
from less import lidar

scene = lidar.from_las(
    "als_plot.las",      # 见 §2 的样例数据下载
    lai=1.5, understory_lai=0.5,
    normalize=True, cache=True,
)
scene.illumination = less.Illumination(source=less.Sun(zenith=45, azimuth=180), atmosphere=less.NoAtmosphere())
sensor = less.OpticalImager(
    projection=less.Orthographic(resolution=0.5),
    bands=[550, 650, 850], quality=32,
)

# 1) 默认渲染
img1 = scene.simulate(sensor).to_brf()
less.save_image(img1, "out/01_baseline.png", false_color=[2, 1, 0])

# 2) 改光谱再来一遍(不重建 BVH,秒级)
scene.objects["forest"].set_property("leaves", less.SpectrumDB("larch_leaf_green"))
scene.terrain.set_property(less.SpectrumDB("loam_brown"))
img2 = scene.simulate(sensor).to_brf()
less.save_image(img2, "out/02_larch_loam.png", false_color=[2, 1, 0])

# 3) 保存为可继续编辑的 Project(含命名 sensor)
project = less.Project(
    scene=scene,
    title="Plot 01 baseline",
    author="qijb",
)
project.add_sensor(sensor, name="Nadir multispectral")
project.save_directory("out/plot01.less")
相关章节:16 - Scene 与 Project(参数热更新、工程资源和 Project Format v2)。
相关 API¶
less.lidar.reconstruct()、less.lidar.preprocess()less.lidar.estimate_lai()、less.lidar.build_scene()less.Scene、less.Projectless.SpectrumDB、less.Prospect、less.Terrainless.save_image()